
Copic Tutorial - Monochromatic Coloring
By Colleen Schaan
Join our coloring expert and learn just how easy it is to give your stamped images a lovely vintage look with sepia inks.
Supplies Needed:
- White cardstock
- Line image (printed or stamped)
- Copic® markers
Monochromatic coloring uses only one hue (color) for an entire image. This creates a subtle, often peaceful feeling, but can lead to a lack of contrast. It is often challenging to create visual interest and dynamic depth when using a monochromatic color scheme. But with careful planning and thoughtful color choice, your "single color" project can be satisfying and successful.
Sepia Tones
I absolutely love the look of old, vintage photos. The lush sepia tones often evoke nostalgic feelings of days gone by -- a time when life was simpler. Sepia tones are rich, reddish browns used to create a monochromatic tint. In this issue, I'm excited to share how I use Copic markers to recreate the antique look of monochromatic sepia coloring.
Step 1: Stamp or print two images onto white cardstock.
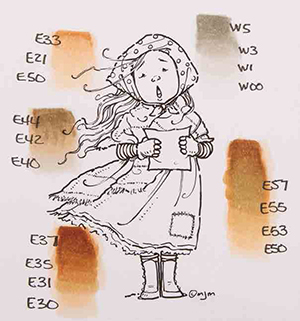
Step 2: Using markers from the E color family, test a number of combinations on one of the images. Make sure to label each combination. Since sepia typically has a reddish tone, I focused mainly on the E3's and the E5's. I noticed the E4's and the W's would also coordinate without detracting from the reddish tone. The E7's were too purple, the E8's were too green, and the E9's were too orange (Photo 1).
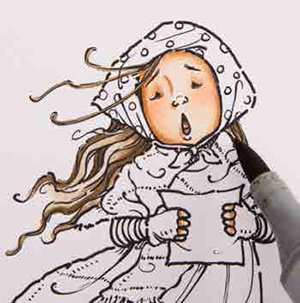
Step 3: Begin by coloring the skin tones with E50, E21 and E33. The base tone for the skin is very important, so plan carefully. A base of E50 helps tone down the reds from the E21 and E33. Add a touch of E93 to the cheeks and blend well. Don't forget to color inside the mouth (E33) and the lip (E04) (Photo 2).

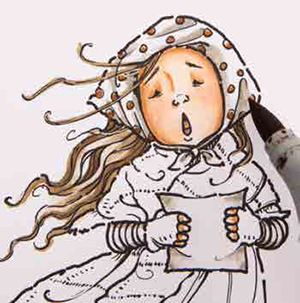
Step 4: Color the hair with E40, E42, and E44. It's important to pick a color that is slightly different in tone than the body of the image to help create depth. The E4's have a slightly gray tone and effectively desaturate the hair and visually push it to the back of the image (Photo 3).
Step 5: Color the kerchief, paper, sleeves, leggings and ruffle with W5, W3 and W00. These items are actually white, but as you know, white has colored shadows. The W's are a warm gray with a very brown tone, so they work perfectly in conjunction with the other colors for sepia. Because these areas are so small, lay down the darkest color first, and then blend with the lighter colors to avoid feathering into the highlight areas. Add dots of E37 to the kerchief (Photo 4).
Step 6: Color the dress with E30, E31, E33, E35 and a small amount of E37. Plan ahead and make sure the dress doesn't get too dark. Color the white patch using the warm grays listed in Step 5 (Photo 5).
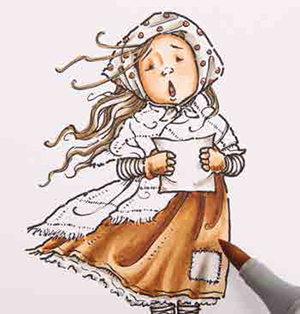
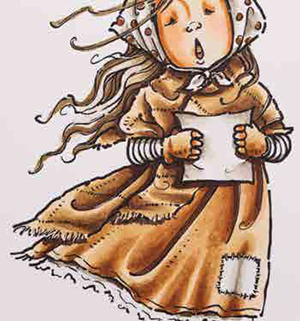
Step 7: Color the scarf and boots with E30, E50, E53, E55, E57 and a small amount of E59. The E5's have a slightly green tone that will help differentiate the scarf and boots from the dress. Starting with a base of E30 helps soften the green and unifies the reddish tone of the whole image (Photo 6).
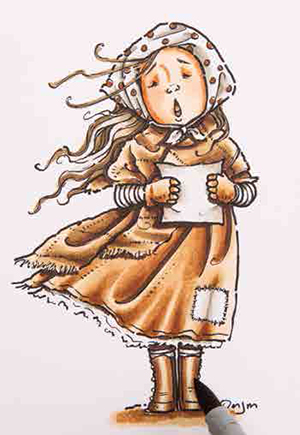
Step 8: Add cast shadows with E79. Cast shadows help separate objects in the image and add a bit more visual depth (Photo 7).
Tips & Tricks
- Make sure the tones of each color combination work harmoniously.
- Use the same base color for multiple objects to unify tone.
- Plan ahead. Test colors and plan for a variety of shades (lights and darks).
- Use cast shadows to help create visual depth.
This Copic tutorial was first published in the Winter 2014 issue of CardMaker magazine. To get more information on Copic marker techniques:
- Purchase a copy of Colleen's book Copic Coloring Guide.
- Check out Colleen's blog, www.distinctivetouches.com.
- Subscribe to CardMaker magazine, where Colleen has a regular column featuring Copic marker techniques.
