
Copic Tutorial - Coloring Metal
By Colleen Schaan
Copic markers don't come in metallic colors, but it's easy to layer and blend them to create the appearance of different types of metal.
In this tutorial I'd like to share with you some of my favorite color combinations for a variety of metals, as well as my approach to highlighting and shading them.
Before beginning, decide what type of metal you want to represent. Keep in mind that each metal has a different type of surface, and therefore various color application methods are used for highlighting, blending and shading.
Metals like gold, polished silver and chrome are extremely reflective. Reflective surfaces have a lot of contrast, sharp lines and little to no blending.
Metals like galvanized steel, pewter, old tin and oxidized copper are less reflective and have less contrast and softly blended highlights and shading.
Copic Gold or Silver
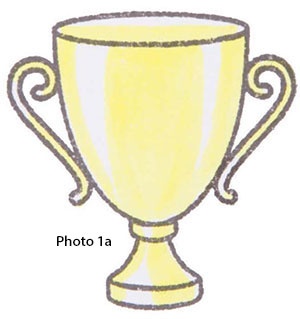
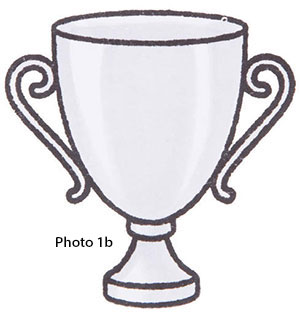
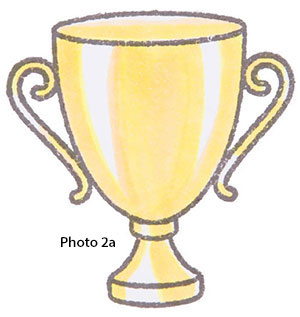
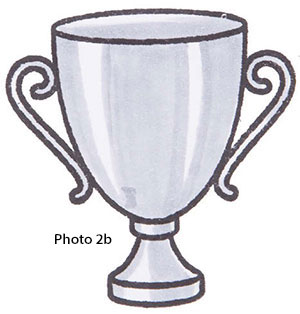
The steps immediately below can be used for coloring either gold or silver as the technique is the same for both. When coloring gold, I use Y04, Y23, YR23 and Y28. The bright yellow base gives the metal a warm golden glow. When I color silver, I use C1, C3, C5 and C7. The cool grays create a bright reflective surface. (Colors are listed from the lightest to the darkest shades.)
Step 1: Start by identifying the light source. In these examples, the light is coming from the front left, creating a large highlight on the left-hand side of the trophy. There will be a smaller highlight on the right-hand side due to reflected light as well.
Using the lightest shade, apply color to all of the areas of the trophy except the highlights (Photos 1a and 1b).
Step 2: With the middle shade, color over all of the areas previously colored. Leave the highlights white (Photos 2a and 2b).
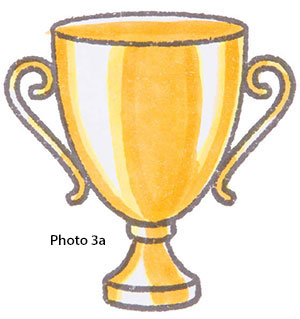
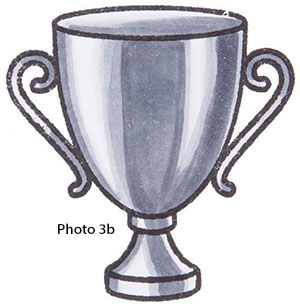
Step 3: Using the next darker shade, add color to the areas of shadow. When applying ink, mimic the shape of the object. Make sure to leave the lines between the shades/colors crisp (Photos 3a and 3b).
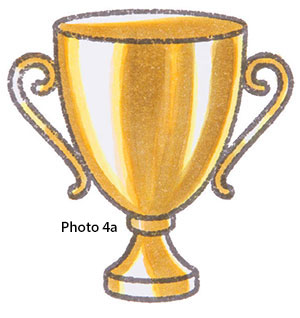
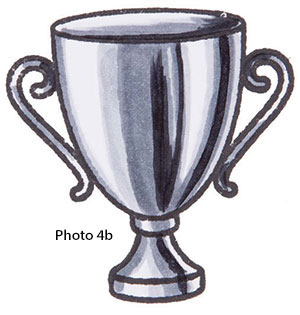
Step 4: Using the darkest shade, add lines of color to the areas of darkest shadow. Keep the highlights white and the edges crisp (Photos 4a and 4b).
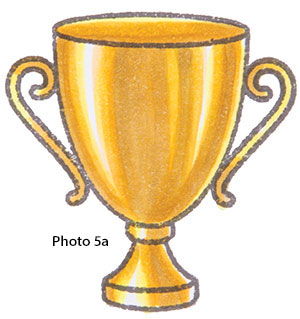
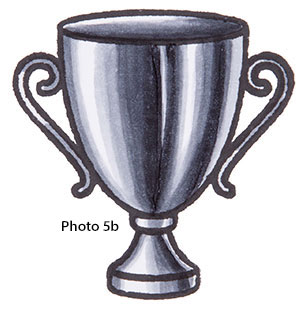
Step 5: Finish coloring the image by adding one or two strokes of the lighter shades to the edges of each shadow area moving toward the highlight. Do not blend; leave the edges crisp and linear (Photos 5a and 5b).
Copic Steel or Pewter
Coloring galvanized steel or pewter uses a similar technique with slightly more blending. While there are many successful color combinations for this type of metal, my favorite is W1, C3, C5, C7 and Colorless Blender (0). Beginning with a warm base gives the metal a slightly weathered look, while blending with the Colorless Blender creates a softer, less reflective surface.
Step 1: Identify the light source and areas of highlight and shadow. Using the warm gray, apply color to all of the areas of the trophy except for the highlights (Photo 6).

Step 2: With the lightest cool gray, color over all of the areas previously colored. Leave the highlights white (Photo 7).

Step 3: Using the next darker gray, add color to the areas of shadow. Leave some of the lighter areas visible. When applying ink, mimic the shape of the object. Make sure to leave the lines between the shades/colors crisp (Photo 8).

Step 4: Using the darkest gray, add lines of color to the areas of darkest shadow. Use this color sparingly as it can easily overpower the image. Keep the highlights white and the edges crisp (Photo 9).

Step 5: Blend the shaded areas out toward the highlights using each of the lighter shades. Notice the highlights are no longer white (Photo 10).

Step 6: Finish by using the Colorless Blender over the entire image to softly blend and lighten the colors creating a soft, dull surface (Photo 11).

Copic Copper, Rusted & Oxidized Metal
Coloring copper, rusted or oxidized metal is one of my favorite techniques. The key is to layer a variety of colors ranging from reds to browns to greens. In this sample I use R02, W3, W5, G21, E99 and E95. Using a lighter shade at the end will help soften and blend the colors to give the metal a muted or textured look.
Step 1: Identify the light source and areas of highlight and shadow. Using the light red (R02), apply color to the entire image including where the highlights will be (Photo 12).

Step 2: With the lightest warm gray (W3), color all of the areas except for the highlights (Photo 13).

Step 3: Using the darker warm gray (W5), add color to the same areas as the previous step. When applying ink, mimic the shape of the object (Photo 14).

Step 4: Using the light green (G21), add color to the areas of shadow. It is OK if some color overlaps into the highlight, but do not completely cover (Photo 15).

Step 5: Using the darkest brown (E99), add color to the darkest areas of shadow (Photo 16).

Step 6: Finish by using the lighter brown (E95) to soften and blend out any hard lines. Notice the highlights become darker and softly blended as well (Photo 17).

Tips & Tricks
- Remember that highly reflective metal surfaces will have lots of contrast, with bright highlights and crisp, hard lines.
- Older or duller metals will have soft blends, less contrast and possibly even textured surfaces.
- Play with a variety of color combinations to create your favorite metal surfaces.
This Copic tutorial was first published in the Winter 2015 issue of CardMaker magazine. To get more information on Copic marker techniques:
- Purchase a copy of Colleen's book Copic Coloring Guide.
- Check out Colleen's blog, www.distinctivetouches.com.
- Subscribe to CardMaker magazine, where Colleen has a regular column featuring Copic marker techniques.
