|
Blocking Basics
Crochet
Blocking your crochet items puts the finishing touch on your hours of stitching. While it isnt the favorite part of the project for many of us, blocking truly enhances and beautifies your crochet projects. In this Annies special edition FREE video class, youll gain valuable information on blocking techniques and materials that applies to both crochet and knit items. The helpful content in this class is a compilation of blocking instruction given in three Annies Online Classes: Crocheting With Thread with Susan Lowman, Knit Finishing Techniques with Carri Hammett, and Lace & Openwork Knitting Workshop with Jill Wright. In this free class, youll learn:
- Why blocking is essential, and how it changes the look of your projects
- What supplies are needed for blocking
- How to make an inexpensive and lightweight blocking board
- How to block garments to the schematic and your body
- How to block doilies, filet crochet and lace
- How to wet block, steam block and block with wires, pins and thread
Take advantage of this free Annie's Special Edition Online Class, and learn how to successfully and beautifully block your crochet pieces.
Blocking is an important step toward
making your crocheted pieces look more
professional. Its a way of dressing or
finishing your projects using moisture
and sometimes heat. Proper blocking of a
crocheted garment or accessory can go a long
way toward making it look and fit better, and
it can help restore symmetrical balance to a
misshapen afghan or rug. Blocking sets the
stitches and can even enhance the drape of
the fabric. Seaming and edging are easier on
blocked pieces, and minor sizing adjustments
may be made during the blocking process.
There are different methods for blocking
crocheted pieces, and knowing which one to
use for a particular project can make all the
difference in achieving a successful result.
Choosing the correct blocking method
depends on what the item is and what type of
yarn or thread is being used. Some items might not
be suitable for blocking, such as 3-D pieces
that are difficult to handle or very small items
such as Christmas ornaments. Also, certain
fibers might not be suitable for blocking. |
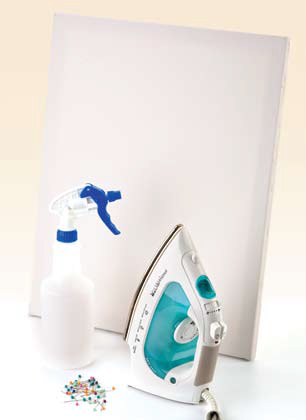 |
Getting Started
Youll need a blocking board, rustproof pins,
a steamer or steam iron, a spray bottle,
and your yarn or thread labels. A blocking
board needs to be a flat surface thats large
enough to hold the piece or pieces you want
to block. Pieces should not hang over the
edges of the blocking board.
If you dont have, or cant find, a commercially
made blocking board, its easy to create your
own. The free blocking video includes a detailed tutorial on how to make your own inexpensive blocking board. Purchase a piece of plastic foam insulation
board at your local home-improvement
center or foam board from an office-supply
store. In choosing the size, keep in mind
that while a larger board can block more
pieces, it may be difficult to store. It might be
better to purchase several smaller boards.
Cover the board with a thick towel and then
with a clean cotton cloth, both of which have
been washed so that they will not bleed onto
your work. While solids usually work best,
you can use a fabric with a large check print
or stripes in order to have a blocking guide.
Your blocking board will need to be in a
location where it can remain undisturbed
until the blocking is finished, which can
range from just a few minutes to more than
a day, depending on the circumstances.
The board needs to be able to handle pins,
moisture and heat. To block large items such
as afghans or shawls, for example, a guestroom
bed or a large, well-padded tableeven
a sheet-covered carpeted floorwork great.
::banner_s::
Choose Your Method
Blocking methods may be described as wet,
dry or cold. The actual method you choose
will vary depending on yarn content, final
use and your own preferences.
Consult the yarn label. If different fibers have
been combined in the same item, the most
delicate fiber takes precedence. Most natural
fibers such as wool, cotton, linen and mohair
may be either wet- or dry-blocked. Some
synthetic fibers do not benefit from blocking
and may, in fact, be ruined by careless
blocking. Novelty and metallic fibers may
need special care and may not be suitable
for blocking.
While its always advisable to make a test swatch
for any pattern to check gauge, an added benefit
to making a swatch is that you will also have
a piece to practice blocking to make sure you
are using the proper method. For example, did
you know that too much heat can kill acrylic
yarn, making it shiny and limp? Its better to
wreck a swatch than a whole afghan.
Wet blocking is suitable only for those fibers
which tolerate submersion. Wash the
piece first, if desired, or thoroughly wet it
and gently squeeze out excess water. Do
not wring or twist! For two-diminsional
pieces, lay the piece out flat, and gently
pat and shape it into the desired finished
measurements. Pin the piece securely in
place using rustproof pins or blocking wires.
For 3-D pieces, stuff the piece with rolled up
plastic grocery bags or other waterproof
stuffing. For round pieces, blowing up a
balloon to the desired size inside the item
works well. Leave the piece undisturbed
until it is completely dry. You can hasten the
drying process by setting up a fan to blow
over the area.
Dry blocking is suitable for fibers which can
tolerate moisture and heat (steam). Pin the
piece into the desired shape and size on the
blocking board. Pins should be close together
and evenly spaced so as not to distort the
fabric. Blocking wires also work well.
Smooth all seams and areas that are puckered or
rippled as much as possible with your fingers.
Holding a steamer or steam iron an inch or
more above the item, steam the fabric well.
Move the iron slowly over the surface, never
allowing it to touch the fabric; do not press.
After steaming, leave the piece undisturbed
until it is completely cool and dry.
Cold blocking can be used for fibers which can
tolerate moisture but not heat. Pin the piece
into shape on the blocking board as you did
for dry blocking. Mist with a spray bottle
of clean water until the piece is completely
wet. If stubborn areas resist lying flat, use
additional pins as needed or press with your
hand for a few seconds (its amazing how the
gentle warmth from your skin can help!). Leave
the item undisturbed until it is completely
dry. Again, a fan can help speed things up.
Tips for Blocking Afghans & Other Large Pieces
Afghans and other large crochet pieces, such
as tablecloths, bedspreads and shawls, can
easily be blocked on a bed with a firm or
extra-firm mattress, on a large, well-padded
table, or on a clean, carpeted floor.
Arrange the piece into a nice, even shape to the
required or desired measurements, taking
care not to overstretch or distort the shape
of the piece. Using rustproof pins, pin all
edges down securely around the entire piece.
If any stubborn areas dont want to lie down
smoothly, adding a few extra pins in these
spots usually does the trick.
If desired, the piece can be dry-blocked as
previously instructed. But, for large pieces
such as these, you can also achieve beautiful
results by blocking without the use of steam.
Using a large spray bottle of chemical-free
water, mist the piece thoroughly until it is
lightly wet (semi-saturated). Use your hand
to gently press each area as it is sprayed. Its
amazing how just the heat from your skin
acts like a low-heat iron of sorts on wet yarn
or thread, but without the possible damage
to yarn fibers that an iron can cause.
After the piece is thoroughly wet down and
hand-pressed, have a fan blow on the
project until its completely dry. The results
will be beautiful!
Now that you know the different ways to block
your projects and which method works best
for each, youll feel more confident to take
that extra step and give your projects a more
finished look with the results you desire. But,
dont forget to practice on a test swatch first! |
|
|


