|
Free Form Piecing
You relegate your ruler to a straightedge for your rotary cutter, refuse to rip out seams, correct block size mistakes by trimming or adding fabric, your blocks are wonky, and the only standard quilting rule you adhere to is to use at least a 1/4" seam. Guess what, you belong to the ranks of free-piecing quilters.
Adherents of free piecing use the following tips and tricks to create quilts full of figure blocks of people, animals, flowers, trees and buildings. They also use the same tips and tricks to make common blocks and units even less stressful by throwing away their rulers and forgetting the quilting math some of us struggle with. Free piecing requires embracing wonkiness and relying on your own eye for size.
Planning Your Design
Like any other type of quilting, decide first what the theme will be and how your quilt will be used. This will guide fabric choices, and quilt and block sizes. Will the quilt use figure blocks or just common blocks and units like stars, log cabins, flying geese, etc.?
For figure blocks, decide on a finished quilt size and mark that size on your design area in painter's tape. Arrange your completed blocks within this parameter, trimming them to fit or adding other elements to fill the area as you go along.
For common blocks, plan more traditionally deciding on block or unit sizes, borders and overall finished quilt size. These will be open-ended decisions that may change as the work progresses.
Choosing Fabrics
Begin a free-form figure project by sorting through your stash -- scraps and yardage. Choose some solids to help tone down and tie together what can often be busy blocks. Choose other fabrics based on their designs. For example, birds, wildflowers or ducks would all evoke certain images that can be worked into blocks.
Free-piece quilters often agree that common blocks and units look better being made with solids or small prints that read solid and a small amount of larger prints.
Constructing Figure Blocks
Make each block with an approximate size in mind, so that blocks may have a common measurement but are not exactly the same. Note: Planning blocks by sketching your ideas may avert problems during construction, but sometimes just going with the flow is great!
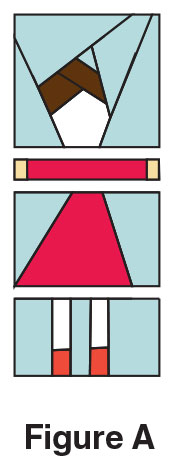
1. Divide your blocks into sections that can be easily constructed. Figure A illustrates how a little girl block can be divided into four sections: head, arms/hands, skirt and legs/feet. Keep in mind the proportions of each section you are making in relation to the whole design. The legs/feet and skirt take up most of the length of a body, so they will be approximately two thirds of the overall length.
|
 |
|
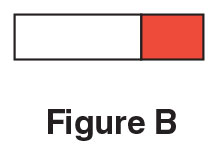 |
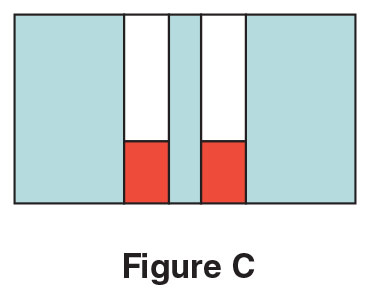
2. Using two different scrap strips for the leg and foot pieces, stitch the leg to the foot (Figure B); repeat. Add background scraps between the leg/foot units and on either side to complete the legs/feet section. Trim the top and bottom of the section straight (Figure C). Note: Use your rotary blade and mat with a ruler as a straightedge and eyeball the cuts. Keep the widths longer than you expect to need so that positioning the sections together is easier.
|
 |
3. To make the skirt section, layer a skirt scrap on a background scrap; both scraps should be approximately the width required. Rotary-cut both strips at angles to make the skirt as shown in Figure D. Remove the cut-away pieces.
|
 |
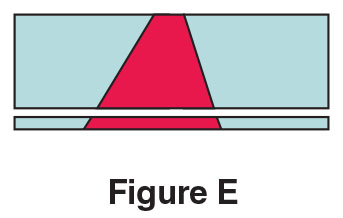
4. Stitch together the skirt and background pieces. Then trim the completed section straight on top and bottom to achieve the desired height (Figure E).
|
 |
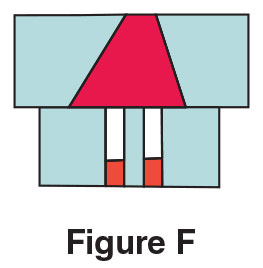
5. Stitch the skirt section to the legs, positioning as desired (Figure F).
|
 |
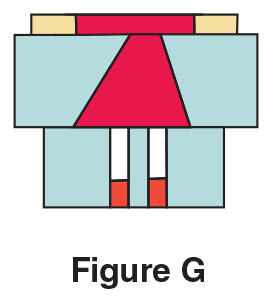
6. Make the arm width a little narrower than the skirt bottom width. Stitch long hand pieces to both arm ends. Stitch the arms/hands section to the skirt section (Figure G).
|
 |
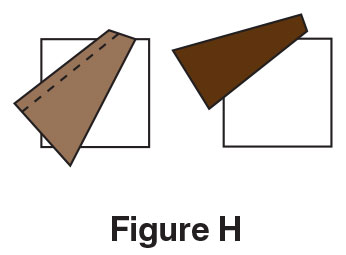
7. To make the head section, begin with a scrap for the face area, stitch and flip hair scraps to the top of the head as shown in Figure H. As with crazy quilting, trim seam allowances to approximately 1/4" wide before adding another scrap. Note: Some block elements are easier to construct using a crazy-quilt technique rather than stacking and cutting. You can create animals, people, plants and some very unique shapes this way!
|
 |
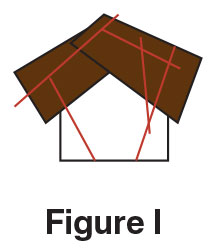
8. Stitch and flip background fabric to the head, referring to the red lines in Figure I, creating the head shape. Make the section at least as wide as the previous sections. Trim the bottom straight and stitch to the arms/hands section to complete the girl unit.
|
 |
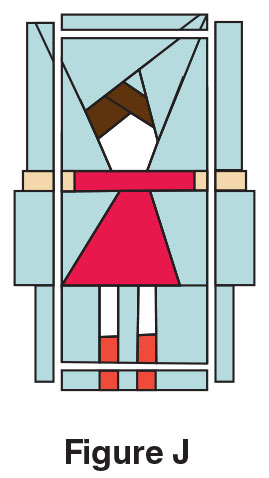
9. Press the girl unit flat and trim all sides straight (Figure J).
|
 |
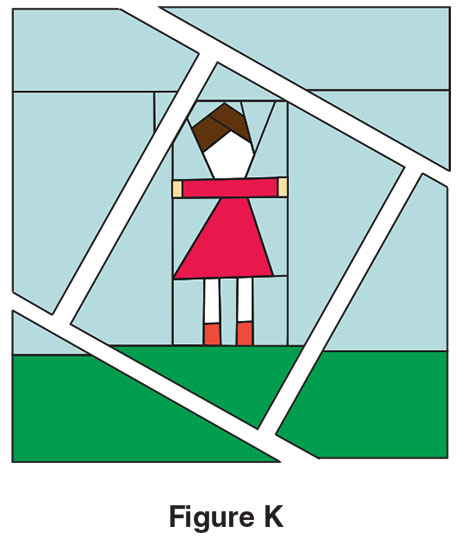
10. Complete the block by adding background to the girl unit and then trim to the block size desired (Figure K).
|
 |
General Tips
Each block will be different, like a jigsaw puzzle, and will need to be adjusted by trimming or adding sashing strips to make each one fit into the quilt parameters. Trimming straight edges for joining blocks is important, but they don’t have to be perpendicular unless you want them to be.
Construction should be unregimented, easy and fun! Trees are just stacked, wonky flying geese units. A rainbow block starts in the middle with a pale violet rectangle, and works around, in an unusual Log Cabin manner. Make it taller by using narrower strips on the sides than on the top.
Pressing seams open is often the best solution to the number of seam allowances that are made using this technique. By pressing seams open, the bulk of the seams is distributed more evenly, which makes quilting easier.
Discuss quilting with your quilter. Add specific elements to the quilting that enhance the individual blocks. Add butterflies in the sky around a girl, a hot-air balloon behind a boy or panels in the door of a house. This, along with the patterns on the fabrics used, add to the character of each figure block.
Constructing Common Blocks
Many quilters have worked enough with different common-size units that they can practically cut an exact 2 1/2" square or strip. They also know the construction of common units like half-squares, flying geese or blocks like the Log Cabin and Ohio Star well enough to do them in their sleep. Free-piecing quilters rely on this knowledge base to create units and blocks without depending on exact measurements. The blocks will have a wonky, primitive look.
For example, to make a half-square unit, layer two pieces of fabric right sides together. Cut strips from the stacked fabrics using your ruler as a straightedge. Cut a square from the stacked strips. Stitch across one diagonal of the square from corner to corner and then trim the seam allowance to 1/4" to make one half-square. Stitch along the diagonal cut edge of the leftover triangles to make a second smaller half-square.
You can also cut the strips and squares from the stacked fabric. Draw a diagonal line on the square and then stitch approximately 1/4" on either side of the drawn line. Cut the square in half on the diagonal line to make two half-squares approximately the same size. |
|
|
